Back to School Set Collection: A Practical Guide for Creators and Small Business Owners
If you’ve come across a Back to School Set Collection while searching for themed design assets, you already know it promises convenience and style. These collections typically include a mix of JPG, PNG, and EPS10 files—ready to use on everything from greeting cards to t-shirts. But behind that promise of simplicity hide a few common pitfalls. Picking the wrong format, misjudging resolution, or not understanding how the elements can be rearranged often leads to wasted time, poor print results, or designs that feel flat. This guide walks through the mistakes people make with these collections and shows how to use them wisely, so every project turns out exactly as you imagine.
What Exactly Is the Back to School Set Collection?
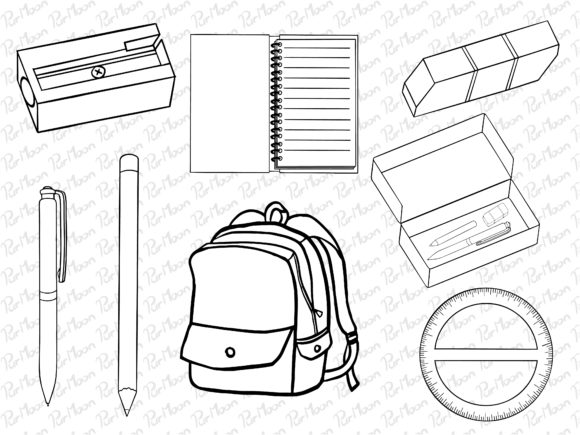
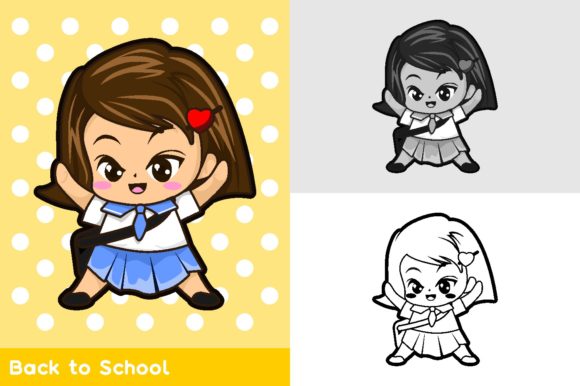
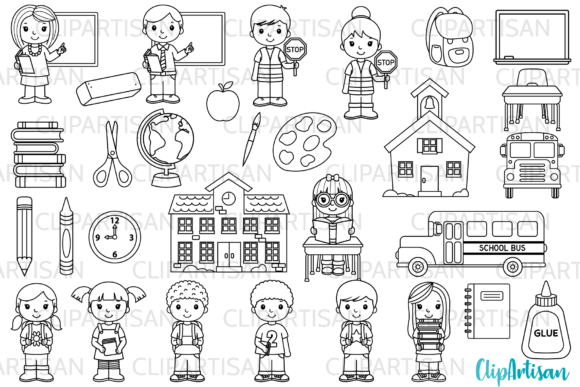
At its core, a Back to School Set Collection is a bundle of digital design assets built around school-themed imagery—pencils, apples, books, chalkboards, lockers, and typography. The files come inside a .zip archive containing three key formats: a JPG with a white background, a PNG with a transparent background, and an EPS10 vector file. This variety means you can use the collection for physical prints (cards, mugs, shopping bags) and digital applications (phone boxes, wall art, social media) without starting from scratch. Because the elements are often individual illustrations, you can rearrange them into new compositions—a huge advantage if you need multiple designs for a back-to-school campaign or product line.
Overlooking File Formats and Their Best Uses
One of the first errors people make is treating all three files as interchangeable. The JPG with a white background is great for simple printing on light-colored surfaces—a greeting card or a white mug, for instance. But if you try to layer that JPG onto a dark t-shirt, the white background will show as an ugly rectangle. That’s where the PNG with a transparent background shines: it lets the design float over any color. The EPS10 vector file takes customization even further because it can be opened in Adobe Illustrator, Affinity Designer, or CorelDRAW to change colors, scale without loss, and rearrange individual elements. Ignoring this distinction often results in extra editing time or subpar prints.
Not Checking Resolution and Print Requirements
A common disappointment happens when a design looks crisp on screen but comes out pixelated on a poster or t-shirt. The JPG and PNG inside these collections are typically meant for standard printing (300 DPI at a modest size), but you should always confirm. If you plan to enlarge the design for a large wall art piece or a shopping bag, the EPS10 vector file is your only safe bet because it can be scaled infinitely. Failing to verify the resolution before buying or downloading leads to fuzzy results—especially in projects where sharpness matters, like framed prints or metal phone boxes.
Assuming the Collection Cannot Be Modified
Many hobbyists and even some small business owners assume the set is “ready-only” and can only be used as-is. In reality, the EPS10 file is designed for rearrangement. You can move the pencil graphic, resize the apple, rotate the chalkboard, and combine elements from different files within the set to create a completely new layout. This is a huge misunderstanding because the collection’s real value is its modular nature. When you treat it as static, you miss out on making it uniquely yours—and you may have to buy expensive custom work or start drawing from scratch.
Using the Wrong Background Type for Your Project
For projects like stickers, wall art, or phone boxes, a transparent PNG is often best because it blends seamlessly. But if the design already contains a white element (like a cloud or a label), a white-background JPG might be fine and easier to handle. The mistake comes when you use the JPG file on a dark background (like a black t-shirt or a dark phone case) and the white box ruins the effect. On the flip side, using a transparent PNG on a plain white greeting card can work, but it may look slightly inconsistent near the edges if the card paper is not perfectly bright. Knowing your substrate matters as much as knowing your file.
Ignoring the Potential for Custom Combinations
Another overlooked area is the ability to combine elements from multiple Back to School Set Collections or other design bundles. The EPS10 vector file often contains separate layers or grouped objects, so you can pull out the book illustration and pair it with a different typography set. This is especially useful for entrepreneurs creating product variations—you can change colors, swap motifs, and keep a consistent theme across a product line. When you treat the collection as a fixed single image, you limit your creativity and the profitability of your designs.
How to Avoid These Mistakes and Get the Most from Your Collection
Start by inspecting the files before you begin any project. Unzip the folder and open each format in its recommended software. Check the dimensions and DPI in the JPG and PNG properties. If they are 3000×3000 pixels at 300 DPI, you can print up to about 10×10 inches without loss. For anything larger, rely on the EPS10 vector file.
Match the file to the final product:
- Use the white-background JPG for printing on white or light surfaces where the background won’t show—think cards, mugs, paper bags, and framed prints.
- Use the transparent PNG for any design placed on a colored background—t-shirts, phone boxes, stickers, notebooks, and dark wall art.
- Use the EPS10 vector when you need to customize colors, sizes, or layout; when printing at large scale; or when you want to combine elements from multiple collections.
Learn to rearrange elements using vector software. Open the EPS10 file in Illustrator or your preferred vector editor. Ungroup the objects if needed, then move, rotate, scale, or change colors. Export from there as a new PNG or JPG with your custom composition. This turns a single set into dozens of unique designs.
Plan your project ahead of time. If you’re creating designs for both a light-colored coffee mug and a black T-shirt, you’ll need at least one background-agnostic file (PNG or EPS10). Don’t assume one file fits all. Keep the original .zip archived so you can always return to the source files.
Check licensing and commercial use rights if you plan to sell the finished products (mugs, t-shirts, invitations). Many Back to School Set Collection licenses allow commercial use, but some may require attribution or restrict resale of the raw digital files. This is a common oversight that can cause legal issues down the line.
What to Check Before You Download or Purchase
When you’re evaluating a Back to School Set Collection, look for these details:
- File formats offered – does it include EPS10? A transparent PNG? If you only get JPG files, you lose the ability to rearrange or scale without loss.
- Resolution and DPI – 300 DPI at a useful size (at least 10×10 inches) ensures clean prints. Lower resolutions are only acceptable for digital use or small items.
- Number of elements – a larger set with many separate illustrations gives you more to remix. Check if the EPS file contains individual objects or just one combined image.
- Compatibility with your software – EPS10 works in most professional vector programs, but older versions of free software may struggle. If you use Affinity or CorelDRAW, confirm the file opens cleanly.
- Examples of white background vs. transparent – a good product page will show the design on a white background (to preview the JPG) and on a colored background (to preview the PNG’s transparency).
- License details – look for “commercial use” or “personal use” statements. Avoid sets that restrict sales of printed merchandise if you’re a small business owner.
Practical Examples of Creative Applications
Greeting cards and invitations: Use the JPG with a white background for the front of a card. Add a printed message on the inside. Because the image has a solid white base, it won’t show through on standard cardstock. For a more layered look, use the PNG transparent file over a colored card stock and add a die-cut shape.
T-shirts and apparel: Open the EPS10 in your vector software. Remove any elements you don’t want, scale the remaining illustration to fit the shirt area, and export as a high-resolution PNG. Send that PNG to your transfer printer—it’s already background-free, so it will print cleanly on any shirt color.
Stickers and decorations: The transparent PNG is perfect for kiss-cut sticker sheets. Place the design onto a cut line in your design software without worrying about a white box. For larger wall decals, the EPS10 vector ensures crisp edges even at 24 inches wide.
Mugs and shopping bags: For white mugs, the JPG works fine. For a colored or patterned mug, use the PNG or a vector export. Shopping bags often require a strong, scalable design—again, the EPS10 format gives you the flexibility to duplicate the image for a repeating pattern.
Phone boxes and wall art: Both cases benefit from the PNG transparent file, especially if the device case is dark. For wall art that you will frame, the white-background JPG printed on photo paper gives a bright, clean look—just double-check the resolution matches your frame size.
Final Thoughts on Choosing the Right Back to School Set Collection
The right Back to School Set Collection is more than a set of pretty images—it’s a toolkit that, when used correctly, saves hours of design work and produces professional results across many products. The key is to avoid treating every file the same. Understand the strengths of JPG, PNG, and EPS10. Verify resolution and transparency. Take advantage of the modular nature of the EPS10 vector to rearrange and customize. And before you buy, confirm the formats and licenses match your specific needs. When you approach these collections with a little knowledge and forethought, you’ll create beautiful, sale-worthy designs that stand out—whether you’re a hobbyist making gifts for teachers or an entrepreneur launching a back-to-school product line.